
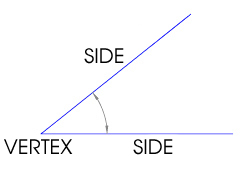
Definition of an angle:
In geometry, an angle is the figure formed by two rays, called the sides of the angle, sharing a common endpoint, called the vertex of the angle.
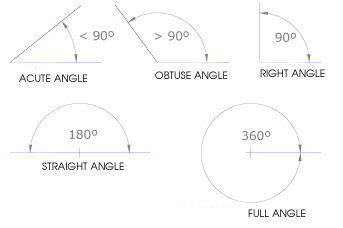
Types of angles:
- Angles equal to 90º are called a RIGHT ANGLES. Two lines that form a right angle are said to be perpendicular.
- Angles equal to 180º are called STRAIGHT ANGLES.
- Angles equal to 360º are called ROUND OR FULL ANGLES.
- Angles smaller than a right angle (less than 90°) are called ACUTE ANGLES.
- Angles larger than a right angle and smaller than a straight angle (between 90° and 180°) are calledOBTUSE ANGLES.
Translation:
In Geometry, “Translation” simply means moving…without rotating, resizing or anything else, just moving.
If we want to draw an angle equal to a given one with vertex at a given point V:
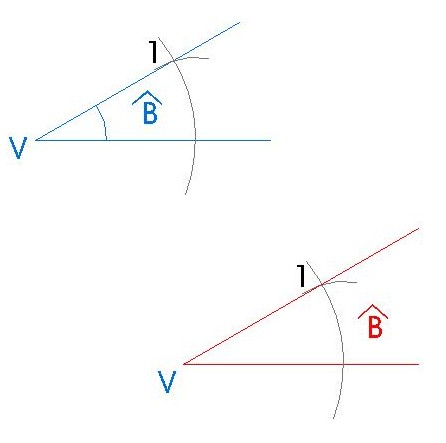
STEPS:
- Center the compass at vertex of the given angle and draw an arc intersecting both sides of it. Without changing the radius of the compass, center it at point V and draw another arc.
- Set the compass radius to the distance between the two intersection points of the first arc.
- Now center the compass at the point where the second arc intersects ray V.
- Mark the arc intersection point 1.
- Join point V with point 1 so you get the equal angle.
ANGLE BISECTOR

It is a line which divides the angle in two equal parts.

STEPS:
First of all, we need to draw an angle and call its vertex O and its sides r.
- Center the compass at vertex of the given angle and draw an arc intersecting both sides of it. We get 1 and 2.
- Center the compass at point 1 and draw an arc.
- With the same measure center it at point 2 and draw another arc.
- Where these arcs cross we get point 3.
- If we join point 3 with the vertex of the angle (O) we get the angle bisector.
ANGLE BISECTOR WHEN THE VERTEX OF THE ANGLE IS OUTSIDE THE PAPER
If we have two lines, r and s, that intersect in a point but that point is outside the paper and we want to get their angle bisector, we have to follow this steps.

STEPS:
First of all we need to draw to lines r and s that intersect in a point outside our paper.

STEPS:
First of all we need to draw to lines r and s that intersect in a point outside our paper.
- Draw a line, t, that intersects with both lines r and s, forming angles A, B, C and D.
- Get the bisector of angles A, B, C and D.
- Where the line bisectors intersect, we will get points M and N.
- If we join points M and N you will get the angle bisector of the angle which sides are r and s.
TRISECTION OF AN ANGLE – DIVIDE A RIGHT ANGLE IN THREE EQUAL PARTS
The only trisection of an angle that is possible to do by a ruler and compass is the trisection of a 90º angle.

STEPS:

STEPS:
- Draw a right angle, to do this we use the steps of the perpendicular to a ray.
- Center the compass at vertex of the right angle (V) and draw an arc intersecting both sides of it. We get 1 and 2.
- Without changing the radious of the compass, center the compass at point 1 and draw an arc, so we get point 3.
- Without changing the radious of the compass, center the compass at point 2 and draw an arc, so we get point 4.
- If we join points 3 and 4 with the vertex of the angle we get the three equal parts of the right angle.
We have learnt how to build angles using only our set of triangles. However, there exist aswell some basic construction to draw angles using the compass. Here we are some examples.
75º ANGLE

STEPS:
- Draw a perpendicular line to ray r on point V; to do this, you will need to follow the same steps given to draw the perpendicular to a ray.
- Center the compass at vertex of the right angle (V) and draw an arc intersecting both sides of it. We will get 1 and 2.
- Without changing the radious of the compass, center the compass at point 1 and draw an arc, so we will get point 3.
- Join point 3 to the vertex of the angle V getting a new angle.
- Draw the line bisector of the new angle, so we will get point 4.
- If we join point 4 to the vertex of the angle V, we will get a 75º angle whose vertex is point V.
105º ANGLE

STEPS:
First of all, you need to lengthen ray r to the left.
- Draw a perpendicular line to line r on point V; to do this, you will need to follow the same steps given to draw the perpendicular to a ray.
- Center the compass at vertex of the right angle (V) and draw an arc intersecting both sides of it. We will get 1 and 2.
- Without changing the radious of the compass, center the compass at point 1 and draw an arc, so we will get point 3.
- Join point 3 to the vertex of the angle V getting a new angle.
- Draw the line bisector of the new angle, so we will get point 4.
- If we join point 4 to the vertex of the angle V, we will get a 105º angle whose vertex is point V.
Fuente:http://educacionplasticayvisualeso.wordpress.com/category/tercero-eso-bilingue/page/5/
No hay comentarios:
Publicar un comentario