BLOG DE AULA

BLOG DE AULA
-Espacio destinado a almacenar todo el material visto en la asignatura de Educación Plástica y Visual para 1º ESO vía bilingüe inglés, y 3º ESO, para que esté permenentemente al alcance de todos los alumnos.
-Banco de recursos y actividades extra.
-Recomendaciones y artículos interesantes.
Mostrando entradas con la etiqueta AMPLIACIÓN. Mostrar todas las entradas

viernes, 17 de octubre de 2014

Some basic constructions


 Here you are some basic constructions to be made with the compass and the set of triangles.

LINE BISECTOR


The line bisector is a perpendicular line that passes through the midpoint of the segment, so it divides the segment in two equal parts.
STEPS:
First of all we need to draw a segment. We call it AB.
  1. Center your compass in point A, open it further from the middle of the segment AB, and draw an arc.
  2. Do the same from point B, where these arcs cross each other we get points 1 and 2.
  3. Join 1 and 2, and this way we will get the line bisector of segment AB.

PERPENDICULAR LINE TO A LINE FROM A POINT ON IT

Given a line and a point on that line, we will construct a perpendicular line through the given point.
We say that a line is perpendicular to other line when they intersect forming a right angle (90º).
STEPS:
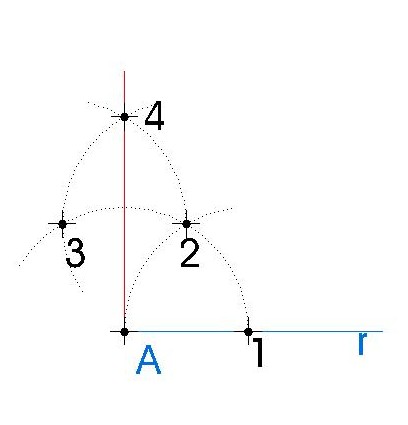
First of all we need to draw a line (r) and mark a point (A) on it.
  1. Center your compass in the given point A and draw an arc with the measure you want, where the arc crosses the line we get 1 and 2
  2. Get the line bisector between 1 and 2
  3. Join 3 and 4, and this way we will get the perpendicular to the given line on point A.

PERPENDICULAR LINE TO A LINE FROM AN EXTERNAL POINT

Given a line and a point outside that line, we will construct a perpendicular line through the given point.
We say that a line is perpendicular to other line when they intersect forming a right angle (90º).
STEPS:
First of all we need to draw a line (r) and mark an external point (A). It doesn’t matter where the point is, below or above the line, the steps will be the same.
  1. Center your compass in the given point A and draw an arc which crosses the given line r two points called 1 and 2.
  2. Get the line bisector between 1 and 2.
  3. Join 3 and 4, and this way we will get the perpendicular to the given line on point A.

PERPENDICULAR LINE TO A GIVEN RAY ON ITS ENDPOINT

We say that a line is perpendicular to other line when they intersect forming a right angle (90º).
STEPS:
First of all we need to draw a ray (r) and call its endpoint A.
  1. Center your compass in the endpoint of the ray (A). Draw an arc with the measure that you want and where this arc crosses the ray we get point 1.
  2. Center your compass in point 1 and with the previous measure draw another arc. Where that arc crosses the previous one we get point 2.
  3. Center your compass in point 2 and with the same measure draw another arc. Where that arc crosses the first arc we have drawn, we get point 3.
  4. Center your compass in point 3 and with the same measure draw another arc. Where that arc crosses the last arc you have drawn, we get point 4.
  5. Joining point 4 with the given point A we will get the perpendicular line to the ray on its endpoint.
In geometry, a line segment is a part of a line that is bounded by two distinct endpoints, and contains every point on the line between its end points. Line segments are generally labeled with two capital letters corresponding to their endpoints.

 ADDITION SEGMENTS

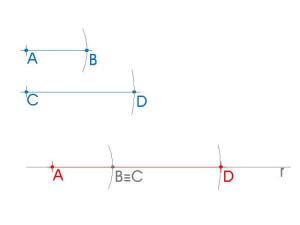
The addition of two segments is another segment that begins at the origin of the first segment and ends at the end of the second segment.
We use this exercise if we have two segments and we want to draw a segment whose length is the addition of the measures of those two segments.
STEPS:
  1. Draw a line (r).
  2. Draw a point A on it.
  3. Measure the given segment AB with your compass.
  4. Draw an arc from A with that measure, so you get B.
  5. Measure the given segment CD with your compass.
  6. Draw an arc from B with that measure, so you get D.
  7. The solution is the segment AD.

SUBTRACTION SEGMENTS

We use this exercise if we have two given segments and we want to draw a segment whose measure is the substraction of the measures of those two segments.
STEPS:
  1. Draw a line (r).
  2. Measure the longest segment with your compass, in our case is the segment CD.
  3. Draw a point C on r.
  4. Draw an arc from dot C with the previous measure (the segment CD), so you get D.
  5. Measure the smallest segment with your compass, in our case is the segment AB.
  6. Draw an arc from D with that measure, so you get B.
  7. The solution is the segment CB.

DIVIDE A SEGMENT IN PROPORTIONAL PARTS TO THE GIVEN SEGMENTS.


STEPS:
    1. Draw a segment and call it AB.
    2. Draw an oblique ray (r) to the segment from A.
    3. Now we are going to divide segment AB into proportional parts to the given segments CD, DE and EF. We know the measures of these segments.
    4. Take the measure of the given segment CD with your compass.
    5. Draw an arc from dot A with this measure and where this arc crosses the oblique ray we get a point.
    6. Take the measure of the given segment DE with your compass.
    7. Draw an arc from the point and where this arc crosses the ray we get another point.
    8. Take the measure of the given segment EF with your compass.
    9. Draw an arc from last point and where this arc crosses the ray we get another point.
    10. Now we need to join this last point with dot B.
    11. Using our set square draw parallel lines to that segment from the other points on the ray.
    12. Where these lines cross the segment AB we get the new segments C’D’, D’E’ and E’F’.
According to Thales’s theorem the segment C’D’ is proportional to segment CD and it will be the same with segment DE and D’E’ and EF with E’F’.

Fuente:http://educacionplasticayvisualeso.wordpress.com/category/primero-eso-bilingue/page/6/

More about Angles


Definition of an angle:


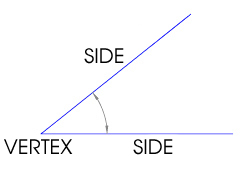
In geometry, an angle is the figure formed by two rays, called the sides of the angle, sharing a common endpoint, called the vertex of the angle.
ANGLE

Types of angles:

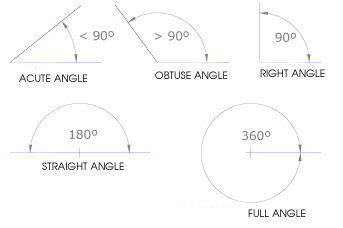
  • Angles equal to 90º are called a RIGHT ANGLES. Two lines that form a right angle are said to be perpendicular.
  • Angles equal to 180º are called STRAIGHT ANGLES.
  • Angles equal to 360º are called ROUND OR FULL ANGLES.
  • Angles smaller than a right angle (less than 90°) are called ACUTE ANGLES.
  • Angles larger than a right angle and smaller than a straight angle (between 90° and 180°) are calledOBTUSE ANGLES.
TYPES-ANGLES

Translation:

In Geometry, “Translation” simply means moving…without rotating, resizing or anything else, just moving.

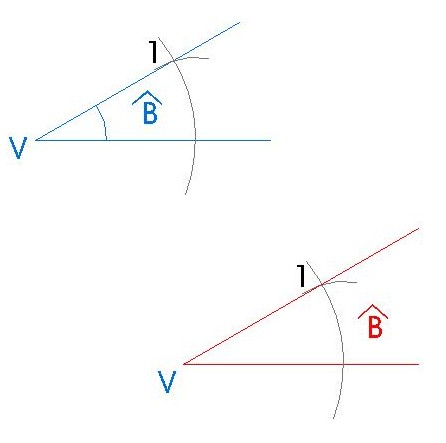
If we want to draw an angle equal to a given one with vertex at a given point V:

TRANSLATION
STEPS:
  1. Center the compass at vertex of the given angle and draw an arc intersecting both sides of it. Without changing the radius of the compass, center it at point V and draw another arc.
  2. Set the compass radius to the distance between the two intersection points of the first arc.
  3. Now center the compass at the point where the second arc intersects ray V.
  4. Mark the arc intersection point 1.
  5. Join point V with point 1 so you get the equal angle.

 ANGLE BISECTOR

It is the locus of the points in the plane equidistant from the sides of an angle. Therefore it is the locus of all the circle centres that are tangent to the sides of the angle.
It is a line which divides the angle in two equal parts.

STEPS:
First of all, we need to draw an angle and call its vertex O and its sides r.
  1. Center the compass at vertex of the given angle and draw an arc intersecting both sides of it. We get 1 and 2.
  2. Center the compass at point 1 and draw an arc.
  3. With the same measure center it at point 2 and draw another arc.
  4. Where these arcs cross we get point 3.
  5. If we join point 3 with the vertex of the angle (O) we get the angle bisector.

ANGLE BISECTOR WHEN THE VERTEX OF THE ANGLE IS OUTSIDE THE PAPER

If we have two lines, r and s, that intersect in a point but that point is outside the paper and we want to get their angle bisector, we have to follow this steps.

STEPS:
First of all we need to draw to lines r and s that intersect in a point outside our paper.
  1. Draw a line, t, that intersects with both lines r and s, forming angles A, B, C and D.
  2. Get the bisector of angles A, B, C and D.
  3. Where the line bisectors intersect, we will get points M and N.
  4. If we join points M and N you will get the angle bisector of the angle which sides are r and s.

TRISECTION OF AN ANGLE – DIVIDE A RIGHT ANGLE IN THREE EQUAL PARTS

The only trisection of an angle that is possible to do by a ruler and compass is the trisection of a 90º angle.

STEPS:
  1. Draw a right angle, to do this we use the steps of the perpendicular to a ray.
  2. Center the compass at vertex of the right angle (V) and draw an arc intersecting both sides of it. We get 1 and 2.
  3. Without changing the radious of the compass, center the compass at point 1 and draw an arc, so we get point 3.
  4. Without changing the radious of the compass, center the compass at point 2 and draw an arc, so we get point 4.
  5. If we join points 3 and 4 with the vertex of the angle we get the three equal parts of the right angle.

We have learnt how to build angles using only our set of triangles. However, there exist aswell some basic construction to draw angles using the compass. Here we are some examples.

75º ANGLE


STEPS:
  1. Draw a perpendicular line to ray r on point V; to do this, you will need to follow the same steps given to draw the perpendicular to a ray.
  2. Center the compass at vertex of the right angle (V) and draw an arc intersecting both sides of it. We will get 1 and 2.
  3. Without changing the radious of the compass, center the compass at point 1 and draw an arc, so we will get point 3.
  4. Join point 3 to the vertex of the angle V getting a new angle.
  5. Draw the line bisector of the new angle, so we will get point 4.
  6. If we join point 4 to the vertex of the angle V, we will get a 75º angle whose vertex is point V.

105º ANGLE


STEPS:
First of all, you need to lengthen ray r to the left.
  1. Draw a perpendicular line to line r on point V; to do this, you will need to follow the same steps given to draw the perpendicular to a ray.
  2. Center the compass at vertex of the right angle (V) and draw an arc intersecting both sides of it. We will get 1 and 2.
  3. Without changing the radious of the compass, center the compass at point 1 and draw an arc, so we will get point 3.
  4. Join point 3 to the vertex of the angle V getting a new angle.
  5. Draw the line bisector of the new angle, so we will get point 4.
  6. If we join point 4 to the vertex of the angle V, we will get a 105º angle whose vertex is point V.
Fuente:http://educacionplasticayvisualeso.wordpress.com/category/tercero-eso-bilingue/page/5/

More about Triangles


TRIANGLES


Definition

triangle ABC is a flat shape limited by three lines which intersect each other two to two, defining the segments a, b and c, which are the sides of the triangle. In order to get those three segments forming a triangle ABC it is necessary that the length of each of those segments is smaller than the addition of the other two and bigger than their subtraction.
A triangle is one of the basic shapes of geometry: a polygon with three corners or vertices and three sides or edges which are line segments.
The addition of all the internal angles in the triangle is 180º.

How to label a triangle

  • The vertices of the triangle are named with capital letters (A, B, C)
  • The sides of the triangle are named with the letter of its opposite vertex (a, b, c)
  • The angles of the triangle are named with the letter of the vertex and angle symbol (^).

Types of triangles

Triangles are classified two ways:

Due to their SIDES:

Equilateral
Three equal sides and angles.


Isosceles
Two equal sides and angles.


Scalene
No equal sides or angles.

Due to their INTERNAL ANGLES

Acute
All their angles are ACUTE.


Right
One RIGHT ANGLE.

In right triangles, the sides that form the right angle are called LEGS and the side that faces them is called HYPOTENUSE.
Obtuse
One OBTUSE angle.

Fuente: http://educacionplasticayvisualeso.wordpress.com/category/tercero-eso-bilingue/page/4/

Some Basic Geometric Construction


BASIC GEOMETRIC CONSTRUCTIONS


1. LINE BISECTOR

It is the locus of the points in the plane equidistant from the endpoints of a segment. Therefore it is the locus of all the circumference centres that passes through these endpoints.
The line bisector is a perpendicular line that passes through the midpoint of the segment.
STEPS:
First of all we need to draw a segment. We call it AB.
  1. Center your compass in point A, open it further from the middle of the segment AB, and draw an arc.
  2. Do the same from point B, where these arcs cross each other we get points 1 and 2.
  3. Join 1 and 2, and this way we will get the line bisector of segment AB.

2. PERPENDICULAR LINE TO A LINE FROM A POINT ON IT

Given a line and a point on that line, we will construct a perpendicular line through the given point.
We say that a line is perpendicular to other line when they intersect forming a right angle.
STEPS:
First of all we need to draw a line (r) and mark a point (A) on it.
  1. Center your compass in the given point A and draw an arc with the measure you want, where the arc crosses the line we get 1 and 2
  2. Get the line bisector between 1 and 2
  3. Join 3 and 4, and this way we will get the perpendicular to the given line on point A.

3. PERPENDICULAR LINE TO A LINE FROM AN EXTERNAL POINT

Given a line and a point outside that line, we will construct a perpendicular line through the given point.
We say that a line is perpendicular to other line when they intersect forming a right angle (90º).
STEPS:
First of all we need to draw a line (r) and mark an external point (A). It doesn’t matter where the point is, below or above the line, the steps will be the same.
  1. Center your compass in the given point A and draw an arc which crosses the given line r two points called 1 and 2.
  2. Get the line bisector between 1 and 2.
  3. Join 3 and 4, and this way we will get the perpendicular to the given line on point A.

4. PERPENDICULAR LINE TO A GIVEN RAY ON ITS ENDPOINT

We say that a line is perpendicular to other line when they intersect forming a right angle (90º).
STEPS:
First of all we need to draw a ray (r) and call its endpoint A.
  1. Center your compass in the endpoint of the ray (A). Draw an arc with the measure that you want and where this arc crosses the ray we get point 1.
  2. Center your compass in point 1 and with the previous measure draw another arc. Where that arc crosses the previous one we get point 2.
  3. Center your compass in point 2 and with the same measure draw another arc. Where that arc crosses the first arc we have drawn, we get point 3.
  4. Center your compass in point 3 and with the same measure draw another arc. Where that arc crosses the last arc you have drawn, we get point 4.
  5. Joining point 4 with the given point A we will get the perpendicular line to the ray on its endpoint.

5. PARALLEL LINE TO A LINE FROM AN EXTERNAL POINT I

We say that a line is parallel to another line when these two lines never cross each other.
STEPS:
First of all we draw a line (r) and draw an external point to it (A)
  1. Center your compass in any point of the line (O) and draw an arc that passes through point A.
  2. This arc will cross the given line (r) in two points; we will call them P and Q.
  3. Draw an arc which radio is the distance between points Q and A taking P as the center. Where that arc crosses the previous one we will get point B.
  4. Join point B with the given point A and you will get p, the parallel line to the given line r.

6. PARALLEL LINE TO A LINE FROM AN EXTERNAL POINT II

We say that a line is parallel to another line when these two lines never cross each other.
STEPS:
First of all we draw a line (r) and draw an external point to it (A)
  1. Take any two points from the given line (r) and call them P and Q.
  2. Draw a circle which radio is the distance between points P and Q taking A as the center.
  3. Draw an arc which radio is the distance between points P and A taking Q as the center. Where this arc crosses the circle we will get point B.
  4. Join point B with the given point A and you will get p, the parallel line to the given line r
Fuente:http://educacionplasticayvisualeso.wordpress.com/category/tercero-eso-bilingue/page/5/

A bit more about QUADRILATERALS

QUADRILATERALS

It is difficult to classify quadrilaterals, so as an introduction to this subject, I quote the definition of quadrilaterals which makes Euclid in his book The Elements”
“Of quadrilateral figures, a square is that which is both equilateral and right-angled; an oblong that which is right-angled but not equilateral; a rhombus that which is equilateral but not right-angled; and a rhomboid that which has its opposite sides and angles equal to one another but is neither equilateral nor right-angled. And let quadrilaterals other than these be called trapezia.”
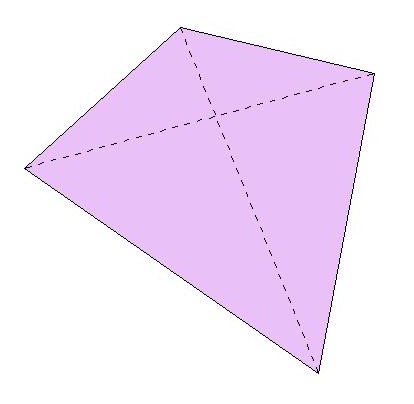
Quadrilateral just means “four sides”. Any four-sided shape is a quadrilateral, but the sides have to be straight, and it has to be 2-dimensional. A quadrilateral is polygon with four corners or verticesand four sides or edges which are line segments. Quadrilaterals can have different shapes, but all of them have four vertices and two diagonals and the sum of all the internal angles is 360º in the simple ones.
There are simple and complex quadrilaterals, we will only study the simple ones. They still have 4 sides, but two sides cross over.
Simple-Complejo

Types of quadrilaterals

Quadrilaterals are divided into convex and concave.
  • A quadrilateral is convex, when none of its internal angles is bigger than 180º.
  • A quadrilateral is concave, when one of its internal angles is bigger than 180º.

Convex quadrilaterals

A. Parallelograms
Parallelogram has opposite sides parallel and equal in length. Also opposite angles are equal. Parallelograms are divided into:
    1. Right: All their internal angles are equal to 90º.
RECTANGULOS
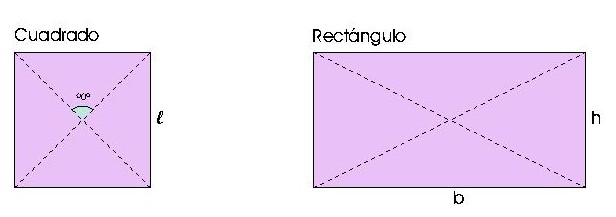
      • Square: All its sides are equal.
Area-cuadrado
      • Rectangle: Its sides are equal two by two.
Area-rectangulo
  1. Other: Their internal angles are equal two by two, opposite internal angles are equal, two internal angles are obtuse and two internal angles are acute.
OBLICUANGULOS
  • Rhombus: All its sides are equal.
Area-rombo
  • Rhomboid: Its sides are equal two by two.
Area-rectangulo
Trapezoid
Trapezium
US
a pair of parallel sides
NO parallel sides
UK
NO parallel sides
a pair of parallel sides
B. Trapeziums (UK) / Trapezoids (US)
Trapezium is a quadrilateral with two parallel sides and the other sides are not parallel to each other. The distance between parallel sides is called height.
Area-trapecio
Trapeziums are divided into:
TRAPECIOS
  1. Rights: One of its parallel sides is perpendicular to the parallel sides.
  2. Isosceles: Non parallel sides are equal.
  3. Scalenes: Non parallel sides are different.
C. Trapezoids (UK) / Trapeziums (US)
Trapezoid is a quadrilateral with no parallel sides.
TRAPEZOIDES
Link to this app to practise quadrilaterals properties.

Fuente:http://educacionplasticayvisualeso.wordpress.com/category/tercero-eso-bilingue/page/5/